I am planning a vacation to the Outer Banks, NC, and am thinking about what photographs I might want to take. Macro shots of crabs on the beach at night, telephoto shots of shore birds, people shore fishing, and maybe wild horses pop to mind. Of course, kids flying kites on the beach and other “street photography” might work out too. None of these require too much preparation. But, there are some piers or lighthouses that are picturesque, require some driving, and should involve planning around sunrises, sunsets, weather, and so on.
On a recent trip to Kitty Hawk for a long weekend with running races, I met a guy who is a help line guru for Canon. He told me that he goes to the Outer Banks fairly often for photography, and recently photographed Frisco Pier in Hatteras with the Milky Way behind it. Way cool! In addition, Frisco Pier is an attraction for photographers, but is seriously damaged and deteriorating. It may be demolished later this summer.
I decided that while I research this, I’ll write an article for the Cable Release. That way, I’ll be able to share what I’ve found. So, I’ll indicate the issues and tools I’m using for a Hatteras trip, but these approaches will apply to other locations and dates in the US as well.
It turns out that in the Northern Hemisphere the Milky Way season is March – October. The Milky Way is not visible in the night sky during the other part of the year. This makes the Milky Way a possible night subject for anyone visiting locations with dark skies this summer.
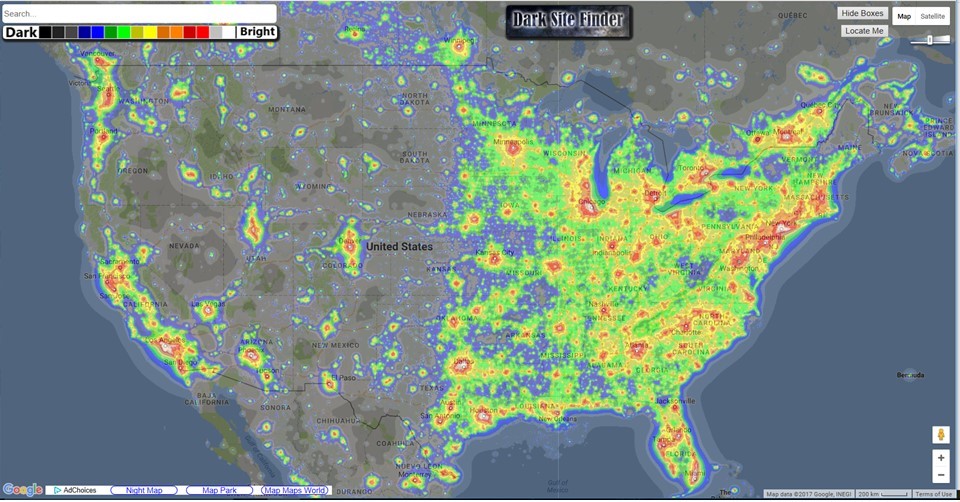
While I am interested in a pier or lighthouse as my foreground, you might have vacation plans to the mountains, deserts, or other places with a nice dark sky. You can use a tool like Dark Site Finder to see if you will be in a dark enough place to do astrophotography. Here is a full scale result from this tool. You can zoom into neighborhood-like resolution by using the tool:
I found that Frisco, NC, next door to Hatteras, is color-coded blue in the map tool. That corresponds to a darker sky than colors that are midway on the scale. So, I know that, at a minimum, terrific photographs can be taken where the color is blue or darker, having seen such photographs.
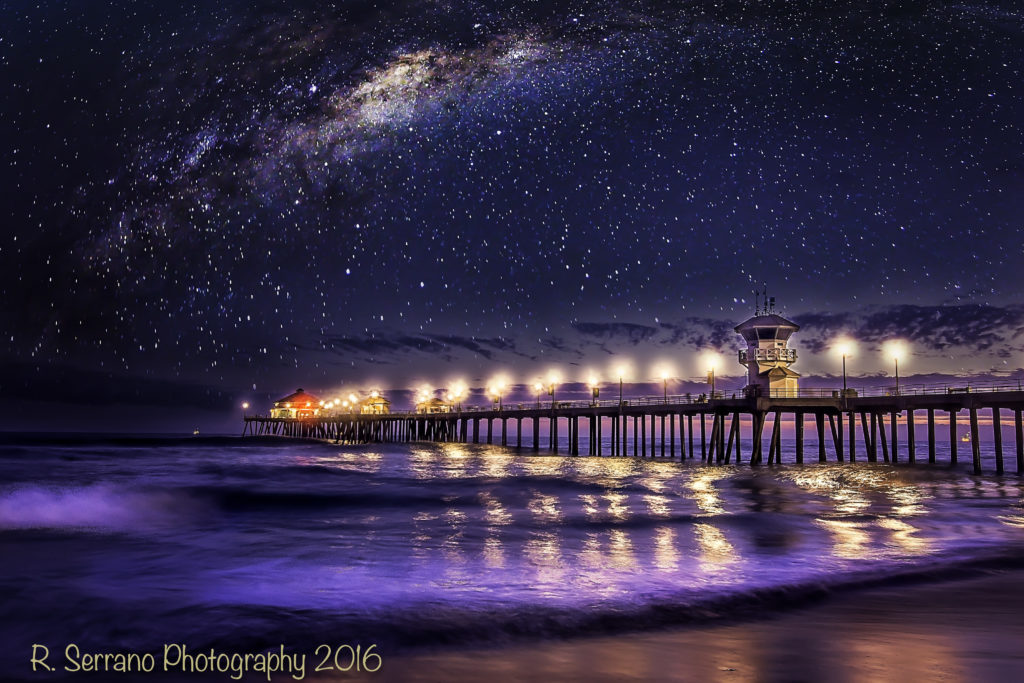
I found an example of an OK pier/Milky Way photograph that the owner has freed from copyright issues that I can include as an example:
but, the really good stuff is copyright controlled (for sale), and includes the very pier I’m interested in: https://fineartamerica.com/featured/breaking-away-jay-wickens.html
This is going to require some planning.
Plan for Seeing the Galactic Center
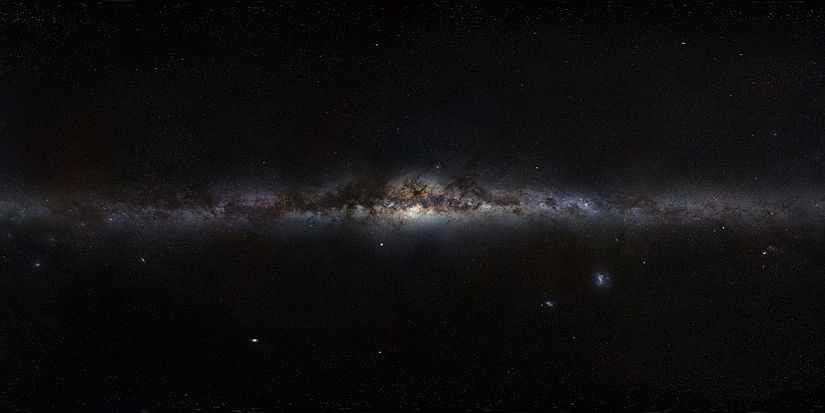
The central hub of our galaxy is the brightest part of the Milky Way. It’s the area of the Milky Way that is full of color, galactic dust, and contrast that will be worth an “all-nighter”. Shooting into the galactic center will make the Milky Way much more pronounced, and will add a lot of detail to the night sky. So, that is the objective. The central hub resides in the constellation Sagittarius.
When and where does Sagittarius rise and set when I want to see it from Hatteras? The answer is straightforward, if a little tedious. Fortunately, the central region of the Milky Way is a very large object, so we won’t need a lot of precision to get close enough.
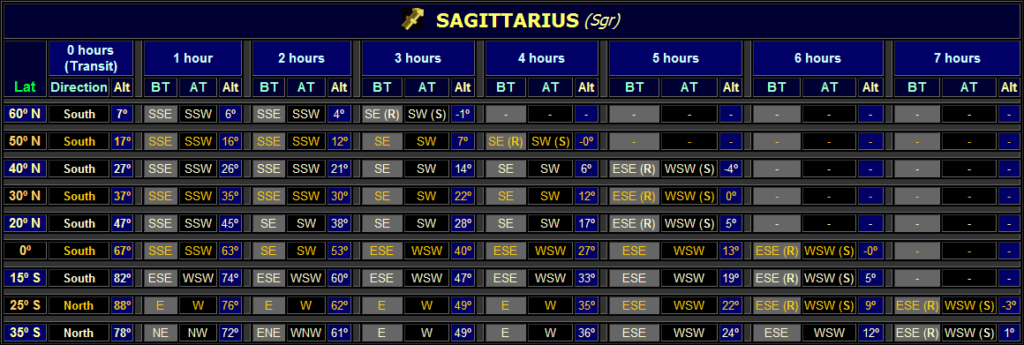
Take a look at the site http://www.aenigmatis.com/astronomy/find/sagittarius.htm
You can see that Sagittarius rises in the Southeast and sets in the Southwest, peaking in altitude due South.
You have a couple of choices for planning your viewing. An easy one is a $9.99 iTunes app called PhotoPills, http://www.photopills.com/. Once you install it, you really do need to look at the website instructions to see how to operate it: http://www.photopills.com/articles/how-plan-milky-way-using-2d-map-centric-planner#step1. Following these directions, it is straightforward to plan your trip and know the angles and times. I see that on June 21, at the pier in Hatteras, that the Milky Way begins to be visible at 10:08 p.m. on June 20 at 143.8° azimuth, at an elevation of 15.4°. It is lost at 4:01 a.m. at 221.5° at an elevation of 11.7°. The 2D maps show direction lines from my selected spot on a satellite map that shows the pier. I can turn on the nighttime virtual reality to see the Milky Way image superimposed on my camera view. I can turn on the sun and moon as well, and check whether the moon is going to interfere. The ease of use may convince you to plunk down the $10. I also did it manually, for free.
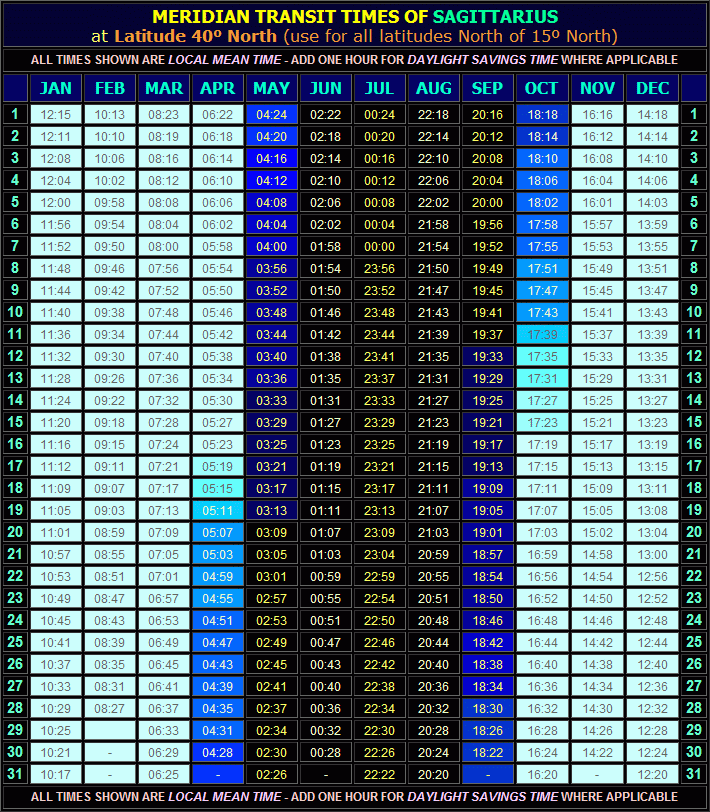
Here is a table from http://www.aenigmatis.com/astronomy/find/sagittarius.htm, applicable throughout the US for the local time when Sagittarius rises to its maximum elevation in the sky – due South (the median transit time). It was calculated for a latitude of 40° North, but can be used for the entire continental US, Caribbean, Europe, etc. The day of the month runs down the leftmost and rightmost columns. A black background corresponds to full night, indicating good conditions, whereas blue indicates twilight, which isn’t so good:
I am interested in a night between June 18 – 24, and I see that Sagittarius reaches its maximum elevation between 1:15 a.m. and 0:51 a.m. at 40° latitude (it gets earlier each night). I will be at 35° latitude, but that’s OK – we’ll account for the difference in the next step. As an aside, the table is accurate to about 30 minutes, which is fine for a rough analysis, especially given that the Milky Way is a huge blob, not sensitive to small time errors.
Next, to find the elevation of the galactic center as a function of observing time and actual latitude, look at the following table to refine the estimate for the desired observing times and directions:
We can see rows provided for 30° and 40° latitude. Houston, New Orleans, and Tallahassee are all close to 30° latitude. Philadelphia, Denver, Springfield, Columbus, and Salt Lake City are all close to 40° latitude.
The first time column [ 0 hours (Transit) ] corresponds to the median transit time found in the table above it, irrespective of the actual median transit time. On June 18 this column corresponds to 1:15 a.m. On June 24 it corresponds to 0:51 a.m. This column says that no matter what your actual latitude is, the median transit occurs to the South. The “Alt” means altitude, which they are using interchangeably with “Elevation”. It is the number of degrees above the horizon (assuming a flat terrain). As we go to locations further south, the maximum altitude of median transit climbs in the sky. The altitude at the median transit time in Column 1 is seen to be 27° at 40° latitude, and 37° at 30° latitude.
What will the altitude at the median transit time be at Hatteras? Hatteras is at 35° latitude, or exactly midway between the 30° and 40° latitude rows provided. So the altitude should be close to exactly midway between the 27° and 37° altitudes in those rows. I will estimate it to be (37° + 27°) ÷ 2 = 32°. And due South, of course.
Now let’s look at the other time columns in the table. The first one is “1 hour”. Under that main column are columns “BT”, “AT”, and “Alt”. “BT” means that we are interested in a time one hour before the median transit time. “AT” means that we are interested in a time one hour after the median transit time. So, on June 18 “1 hour BT” is 1:15 a.m. – 1:00 = 0:15 a.m. The column indicates that at 1 hour before, the direction of Sagittarius is to the SSE (157.5°) . Similarly, on June 18 “1 hour AT” is 1:15 a.m. + 1:00 = 2:15 a.m. The column indicates that at 1 hour after, the direction of Sagittarius is to the SSW (205.5°). The elevation or altitude is the same, whether rising one hour before or sinking one hour after, and is 26° above the horizon at 40° latitude, and 35° above the horizon at 30° latitude. At Hatteras, we can estimate the altitude to be (35° + 26°) ÷ 2 = 30.5° one hour before and one hour after the median transit time.
If we wish to observe the center of the Milky Way two hours before or after the median transit time, i.e. 01:15 – 2:00 = 11:15 p.m. (on June 17) or 01:15 + 2:00 = 03:15 a.m. (on June 18) we look to the column “2 hours” for the 30° and 40° latitude rows and see that the altitude will be (30° + 21°) ÷ 2 = 25.5° altitude at Hatteras. The direction is still seen to be SSE (157.5°) two hours before (BT), and SSW (205.5°) two hours after (AT) the median transit time.
We can continue this process of averaging the two rows of the table for each additional hour earlier or later from the median we wish to go for our photographs. You can see that the directions move progressively away from South at bigger time differences.
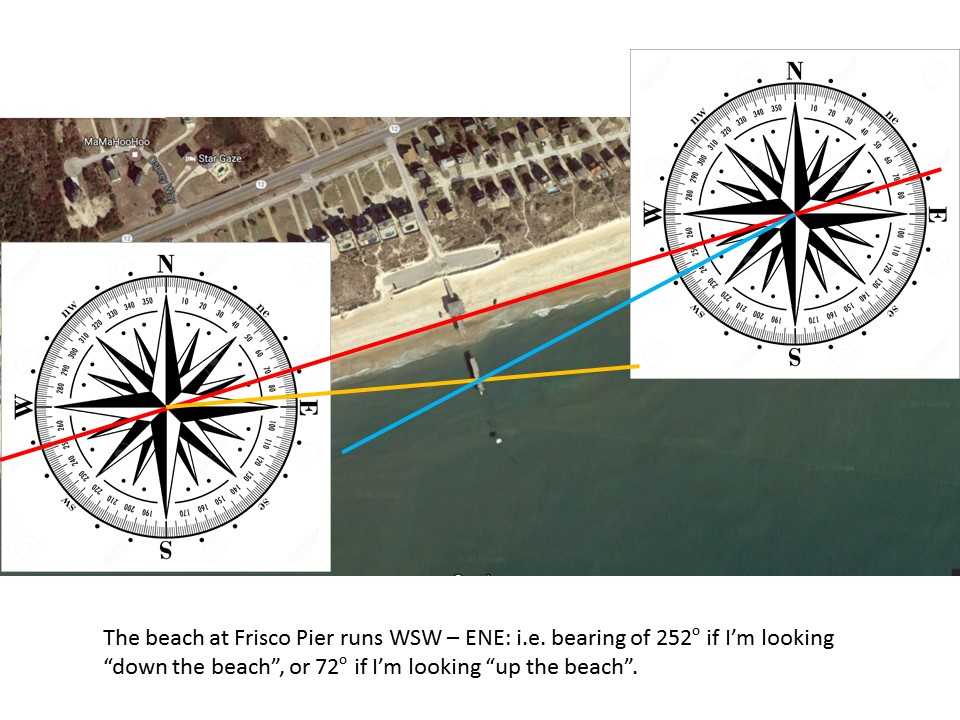 But, the mid point of the pier is anywhere between ~90° and ~230° from me, depending where I set up on the beach.
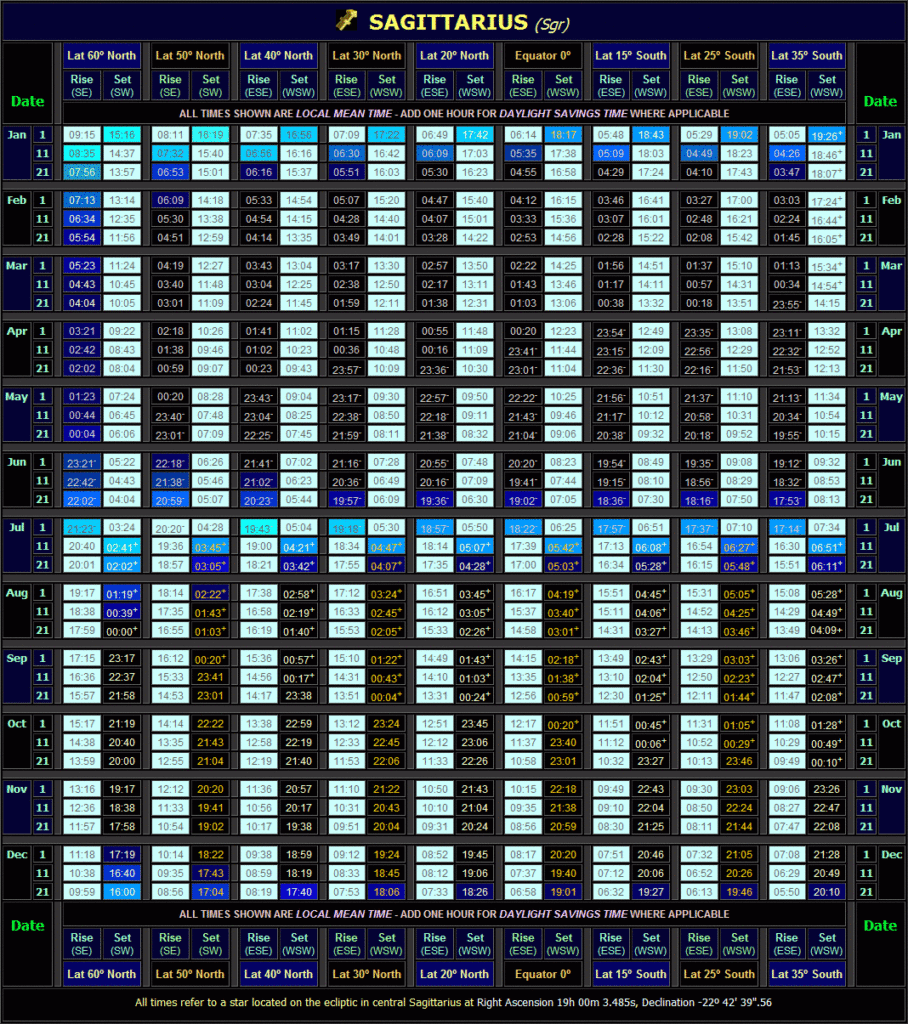
The median transit time puts Sagittarius at a bearing of 180°. That would put the Milky Way behind the large section of off-shore pier only if I were set up a few yards east of the pier building. I may want to shoot earlier than that median transit time of 1:15 a.m. to put the Milky Way behind the pier if I set up further “down the beach”, or later if I want to set up further “up the beach”. I’m concerned that I may have a problem with the elevation angle relative to the pier at earlier or later times. Here is a table (last one) of rise and set times and bearings for the range of dates:
The row for June 21 is within the week I want of June 18-24. Sagittarius rises to the ESE (112.5° bearing) in twilight between 20.23 hours and 19.57 hours for 40° and 30° latitude, respectively. The average, for Hatteras at 35° latitude, is 19.9 hours or 7:54 p.m. This would be at an elevation of 0°, of course. Sagittarius rises from the horizon at this time in the ESE to a maximum altitude of 32° to the South at 1:15 a.m. That is approximately 30 degrees over 5 hours, or 6 degrees of elevation per hour. The bearing will move from ESE to S over the same time, or 13.5 degrees per hour.
I should set up to the North of the pier, and wait about 2 hours after Sagittarius rises, or at about 10:00 p.m., before starting my picture taking. That will put the center of the Milky Way about 12 degrees above the horizon at a bearing of SE. It will move to SSE and then S over the next 3 hours while climbing another 20°. I should be able to visualize this from vantage points north of the pier to arrange good compositions.
Avoid the Moon
The next worry is the moon – that big bright thing that will totally spoil seeing the Milky Way at all. That’s why you need to shoot the Milky Way at a time when the moon is not visible.
Shooting the night sky with no moon leaves you with two options:
- Shoot the night sky during a new moon phase when the moon’s face is completely shadowed.
- Shoot the night sky before the moon rises or after the moon sets.
What is the moon’s phase in mid-June, and when will it rise and set at Hatteras? The PhotoPills app tells me this information as well. Or I can look it up myself.
I see from a Google search that I can get all my moon data from https://www.timeanddate.com/moon/phases/ .
Alternatively, a free online tool that also has a (paid) smart phone app, is The Photographer’s Ephermeris: photoephemeris.com ,. You can use this to determine rise and set times and azimuths of the moon and sun from any location.
The moon’s phase will be “new”, i.e. dark, on June 23 – right near the middle of my date window. So that’s good. I also can see by finding Hatteras, NC on that site, that the moon will rise at Hatteras at 1:48 a.m. or later beginning on June 18, and sets before sunset. So, it will be pretty easy to find times without a moon conflict that week. This is excellent!
Pointing Your Camera at Photography Time
It would be nice if you could just glance at the sky, identify the Milky Way, point your camera, and start shooting. Unfortunately, unless you have a dark dark sky, the Milky Way might be hard to spot, yet will yield nice photographs with the right camera settings if you know where to point. Seeing it will be easier if you dark-adapt your eyes for awhile, avoiding other lights.
There is a handy free smart phone app called SkyView App that applies a virtual reality night sky to your phone’s camera. You point your phone’s camera to the sky, and you will see major stars, the moon, planets, and constellations floating over the camera scene. You could even use the app at the desired location (on the beach near my pier or lighthouse) during the day and “see” the shot for the middle of the night, later. You can do this by resetting the date and time in the app to see the night sky when you wish to take the photographs for planning purposes. This can help identify whether to try shooting early, midway, or later during the transit of the Milky Way across the night sky for the desired composition.
As recommended above the $9.99 PhotoPills app allows you to also see the Milky Way on your phone’s camera, but in better detail, and even easier to use.
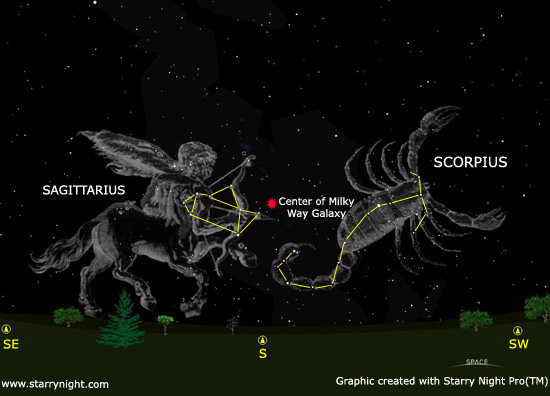
With SkyView, to find the flashy center of the Milky Way, use the app to point your camera around until you find Sagittarius on your display. The constellation is indicated in the app by the cartoon of a centaur pointing a bow – the galactic center is in front of the bow, as shown here:
You simply have to point your “real” camera in the same direction as the smart phone’s direction when oriented toward the front of the constellation Sagittarius. (You’ll find that many planets and constellations are shown below the horizon. These have not risen yet.) In my case I’ll know to where to point the cell phone camera from the planning, above.
Camera Settings
The camera should be viewed as a vacuum cleaner for light when photographing the Milky Way. You want to get it all. Use a shutter speed of 30 seconds, an aperture of f/2.8, and an ISO of 3200 to maximize light, while mitigating noise and star trails.
You want to use a shutter speed of 30 seconds not only to let in a lot of light, but also to eliminate any star trails. Thirty seconds is going to let in a ton of light, and even reveal stars that you can’t even see with your naked eye. However, if you shoot any longer than 30 seconds, it’s very likely you will see star trails in your photo (star trails are the visible movement or paths the stars take in the night sky due to earth’s rotation).
An aperture of f/2.8 is used to let in even more light! If your lens doesn’t go to f/2.8, just use the largest aperture possible via the smallest f-stop value. The challenge of using an aperture so wide open is that if you are including foreground elements into your photos (like a pier or lighthouse), you might have depth of field issues. To resolve focus issues, you can use focus stacking in your Milky Way photos to make everything sharp. Some cameras support this in their native functionality, but some may require external control, as may be acquired with a program like Helicon Remote for camera focus control and shot automation, and the complementary Helicon Focus software to merge them together. You can plan ahead for Depth-of-Field if you know what your foreground object(s) will be, and how far away your camera will be set up. You might be able to get it all sharp in one shot.
Using an ISO of 3200 will make the camera’s sensor more sensitive to light than it would normally be without incurring excessive noise.
Use of shorter shutter times, larger f-stops, or smaller ISO’s can still produce A Milky Way image, but it won’t be as large or bright as with the more extreme values.
On this month’s cover of Shutterbug is a photo of the Milky Way with a model (the photographer) facing the Milky Way, and in silhouette. Bright light surrounds him. He used a flashlight to paint his profile in the last 10 seconds of the 30 second exposure (shutting it off and alternating hands to paint both sides). It is an excellent shot.
Of course, you are going to need a tripod and either a cable release or timer, or perhaps a remote cable to your laptop for focus stacking and automated shooting. Bring extra camera batteries. You’ll want to bring a flashlight, a maybe a compass. If you bring a compass, you need to adjust the magnetic declination for your location (it points toward magnetic north, not true north, and is affected by iron deposits – you can look up the offset for where you are). You’ll probably want an app on your phone, like SkyView or PhotoPills, to make finding Sagittarius easy.
MORE INFORMATION
Michael pointed me to the following website for yet more information, plus inspiration: http://www.lonelyspeck.com/

